Thursday, December 24

Happy Holidays [+ Blog Break]

©DuniStudioDesign


Wishing my lovely readers a Merry Christmas! This has been my 8th year of blogging, so huge thanks to everybody who has been reading along all these years. Thank you for your input and taking the time to comment. Thank you for making "blogging" worthwhile. Usually, around this time in December I review the year, but sadness prevailed this year, so I've chosen to skip it. I'm looking forward to a fresh start next year with lots of new DIY ideas, delicious recipes and a bit of traveling. Until then I am taking an extended blog break. If you like you can stay in touch with me. Take care and many blessings...
Ich wünsche meinen lieben Lesern ein frohes Weihnachtsfest! Ich blogge nun schon seit 8 Jahren und möchte ein großes Dankeschön aussprechen an alle die die ganzen Jahre mitgelesen haben :) Danke für Eure Zeit und die lieben Kommentare. Normalerweise lasse ich im Dezember das Jahr nochmal Revue passieren, aber 2015 ist leider von Trauer geprägt, also lasse ich es lieber sein. Im neuen Jahr hoffe ich wieder mit vollem Elan dabei zu sein, neue Ideen umzusetzen, leckere Rezepte auszuprobieren und eventuell eine Auslandsreise einzuplanen. Bis dahin erlaube ich mir eine verlängerte Blogpause. Wenn Ihr mögt könnt Ihr mit mir hier Kontakt halten. Ihr Lieben, habt es schön...

xoxo

Monday, December 21

Monday Moodboard

Whenever I see turquoise I always think of summer, sun, the ocean...never really associating it with this month, however, it is actually the birthstone assigned to December. Anyway, I love this colour and would wear it in any month :) How about you?
*
Türkis assoziiere ich immer mit Sommer, Sonne und Meer... tatsächlich wird der Schmuckstein Türkis dem Monat Dezember zugeordnet! Wie auch immer, ich liebe diese Farbe und trage sie das ganze Jahr über :) Gefällt Euch diese Farbe auch?
 
1 -- 2 -- 3 -- 4

Friday, December 18

{DIY} Pompom Scarf


Still looking for a gift for your friend, sister, colleague? Here's a cute last minute handmade gift idea that it easy to sew and customizable!

For this project all you need is a length of jersey (knit fabric) in colour of your choice and some leftover wool yarn. Check illustrations below for basic instructions. Use a ball-point needle on your sewing machine.


Auf der Suche nach einer schnellen Handmade Geschenkidee für die Freundin, Schwester oder Kollegin? Dieser Pompom Schal aus Jersey ist originell und schnell genäht!
Dazu benötigt Ihr ein langes Stück Jersey, dicke Wolle für die Pompoms sowie eine Maschinennadel speziell für Jerseystoffe.


(1 + 2) Start by making two pompoms. Follow this method. Use the large cardboard template.
*
(1 + 2) Zunächst zwei Pompoms machen. Hier die Anleitung. Die größere Variante (7 cm) wählen.


( 3 ) Fold fabric in half as shown in illustration. Mark the center and cut off corners diagonally at each end (the angle determines how pointy the scarf will look - mine is 45°). Pin the raw edges from one X to the other X right sides together - leave a 4" gap at one long side. Remember to place the pompoms inside and as close as they go to the pointy tips. Leave long thread dangling for the time being. Carefully and slowly sew a seam (0.4"). When you reach the pointy tip, push pompom to other side, pivot and continue to sew.
*
( 3 ) Jersey wie in der Zeichnung längs falten, rechte Seite innen. Von der Mitte aus an beiden Enden die Ecken diagonal abschneiden (der Winkel richtet sich je nachdem wie spitz zulaufend der fertige Schal sein soll - bei mir 45°). Die offene Kante von X zu X mit Nadeln feststecken, dabei eine 10 cm Öffnung an der langen Kante offen lassen. Pompoms zwischen die Stofflagen schieben und so nah wie möglich an die jeweilige Spitze. Vorsichtig und langsam im Geradstich nähen (1 cm Saum). Sobald Ihr die Spitze erreicht habt, dem Pompom vorsichtig zur anderen Seite schieben, Schal drehen und weiternähen.

( 4 ) Snip off wool yarn. Turn right side out through gap. If necessary, iron lightly. Close gap by hand with a slip stitch.
*
( 4 ) Überstehenden Wollfaden abschneiden. Vorsichtig durch die Öffnung auf Rechts drehen. Leicht überbügeln falls nötig. Öffnung mit ein paar Handstichen schließen.
vegan leather jacket from ONLY | shirt from Uniqlo Berlin | scarf handmade by me

p.s. the past couple of weeks have been so stressful, that it's affected my hair badly. I had no choice but to cut all the frizzy bits off, which leaves me with this casual bob. 
*
P.S. meine Haare haben so sehr unter den stressigen letzten Wochen gelitten, dass mir nichts anderes übrig blieb als die kaputte Partie abzuschneiden. Ich trage jetzt einen durchgestuften Bob.

xoxo

Wednesday, December 16

Green or Blue

Hi lovelies!         Hallo, Mädels!

It's not often that I ask my blog readers for help, but after the difficult couple of weeks I've had it seems my brain is fried. So, I'm asking you today to please help me make a buying decision by answering the following questions. Please leave your answers in the comment section:
*
Ihr Lieben, ich brauche mal Euren Rat, vor allem von meinen nähbegeisterten LeserInnen. Ich bin nämlich von den letzten Wochen noch so erledigt, dass ich kaum entscheidungsfähig bin, zumal es um eine neue, wichtige Kollektion für meinen Shop geht. Ich wäre Euch sehr dankbar, wenn Ihr die folgenden zwei Fragen im Kommentarfeld beantworten könntet:


or / oder


Question A. overall, which colorway do you prefer: GREEN or BLUE?
Question B. if you were to combine TWO patterns, which would you prefer:
  • Roses + Small Flower Print
  • Roses + Ticking Rose Print
  • Small Flower Print + Ticking Rose Print
 ***
 
Frage A. für welche Farbvariante würdet Ihr Euch entscheiden: GRÜN oder BLAU?
Frage B. welche der folgenden Musterkombinationen gefällt Euch am meisten:

  • Rosen + Kleine Blümchen
  • Rosen + Streifen mit Röschen
  • Kleine Blümchen + Streifen mit Röschen
I know...it's so difficult to decide, right? Just go with your gut feeling, that usually works :) Thank you so much everyone - I really appreciate it!
*
Schwierig, schwierig, nicht wahr? Wie auch immer Ihr Euch entscheidet (Bauchgefühl), ich bedanke mich schon mal im Voraus!

Monday, December 14

Monday Moodboard

Since my return I've been putting in a couple of night shifts to clear some of the backlog. Plus I felt really bad not having anything scheduled on the blog...after all, I'm a proud member of the Blogging Business Artisans on Etsy! I'm so pleased that I even managed to complete the Christmas wreath as shown in the previous post. In case anyone is wondering - putting all my energy and creative efforts into my work is how I deal with grief. This entire year has been really tough and I guess I've reached my emotional limit. So I'm focusing on work. Work is good.
Today I'm dedicating this cheery moodboard to my brother who has been a rock these past weeks. Thanks, S.
*
Wieder zuhause habe ich ein paar Nachtschichten eingelegt, um die angestaute Arbeit aufzuarbeiten. So habe ich wieder etwas Luft für neue Blogposts, denn schließlich bin ich ja nicht umsonst stolzes Mitglied der Blogging Business Artisans auf Etsy! Falls sich jemand wundert, dass ich trotz der emotional anstrengenden letzten Wochen so viel Energie in meine Arbeit stecke...nun, das routinierte Arbeiten hilft mir momentan über das traurige Ereignis hinweg.
Heute widme ich diese weihnachtliche Collage meinem Bruder - ohne ihn hätte ich die letzten Wochen kaum überstanden. Danke, S.


1 -- 2 -- 3 -- 4

Friday, December 11

Simple Rustic Christmas Wreath


Holiday crafting is my favourite part in the run up to Christmas. True to this year's rustic & shabby chic theme I have created this simple wreath. It's easy to make and adds a subtle rustic touch to your home!
*
Weihnachtliche Deko basteln macht mir jedes Jahr besonders viel Spaß. Passend zum Rustikal-Shabby Chic Thema habe ich diesen Kranz kreiert. Er geht ganz einfach und macht trotzdem was her!

You'll need || Ihr braucht

white painted twig wreath | geweißter Weiden-Kranz
wide jute ribbon | Rupfenband
assorted ribbons | verschiedene Bänder
wooden stars | Holzsterne 
fabric scrap | Stück Stoff
button | Knopf 
hot glue gun | Heißklebepistole
basic sewing kit | Basic Nähutensilien


How to:

1. I decided on an asymmetrical design with the bow slight off-center to the right. Hot glue this area all around.
2. Wrap jute ribbon around the glued part a few times to create a base.
3. Cut a length of jute ribbon and overlap to create a "bow" shape. Pinch the middle.
4. Attach to base by winding gingham ribbon around the middle a few times and secure with a knot.
 (hidden at back). Snip the ends of jute ribbon to create pointy tips.
*
So geht's:

1. Mein Design ist asymmetrisch, d.h. die Schleife sitzt etwas rechts von der Mitte unten. Dieses Stück großflächig mit Heißkleber bedecken.  
2. Ein Stück Rupfenband zweimal darum wickeln und gut andrücken. Dieses bildet die Basis.
3. Längeres Stück Rupfenband abschneiden und zur Schleife legen. Mittig zusammendrücken.
4. Schmales Karoband mehrmals um die Mitte wickeln und mit Knoten (auf Rückseite) fixieren. Enden hängen lassen.  Enden des Rupfenbandes so einschneiden, dass je zwei Spitzen entstehen.


Finishing touches | das Werk vollenden


The fabric flower is the icing on the cake! Here's my quick and lazy easy way to do it:

1. & 2. For six petals draw three circles (I used a container with 4" diameter) on the wrong side of fabric and cut out. 3. Halve each circle to make six semi-circles. 4. Fold each in half, right sides facing and edge stitch as shown. 5. Turn right side out and place seam at the back. 6. Use a basting stitch at rounded edge. Sew one right after the other. 7. You should end up with something like this. 8. Carefully pull on the bobbin thread from each side to create petals, tighten and knot each end. 9. Stitch first and last petal together to form a flower. Turn over and handstitch around raw edge through all petals to secure.
*
Die Stoffblume ist das i-Tüpfelchen am Kranz! Die Blume ist ruck-zuck genäht, so geht's:

1. & 2. Für sechs Blütenblätter drei Kreise (ich habe einen Übertopf mit Durchmesser 10 cm benutzt) auf die Rückseite des Stoffes zeichnen und ausschneiden. 3. Kreise halbieren. 4. Halbrunde rechts auf rechts zusammenlegen und knappkantig steppen (siehe Foto). 5. Auf Rechts drehen und Naht nach hinten legen. 6. Mit einem langen Geradstich die Blüten nacheinander steppen. 7. So sollte es aussehen. 8. Vorsichtig von beiden Seiten den Unterfaden anziehen, so dass sich die Blütenblätter zusammenziehen. Beide Enden verknoten. 9. Erstes und letztes Blütenblatt zusammennähen. Umdrehen und mit Handstichen rundum mittig alle Blütenblätter fest miteinander vernähen. 


Last few steps:

1. Hot glue fabric flower to center of bow and glue a big button (or in my case a round crystal) to the center.
2. Hot glue wooden stars to wreath.
3. Attach ribbon(s) for hanging.

Letzte Schritte:

1. Mit Heißkleber die Stoffblume mittig auf die Schleife kleben und einen großen Knopf (oder in meinem Fall einen runden Kristall) aufkleben.
2. Holzsterne mit Heißkleber am Kranz fixieren.
3. Band zum Aufhängen anbringen.


And now hang up your handmade Christmas wreath to be enjoyed by everybody! This craft project is part of my Etsy team BBA December challenge brought to you by yours truly.

Sources: black and white ribbon, gingham ribbon and crystal appliqué from Union Knopf | Happy Home fabric from here | everything else from craft store
*
Bezugsquellen: schwarz/weiß Borte, Karoband und Kristall Applikation von Union Knopf | Happy Home Stoff von hier | alles andere aus dem Bastelladen


Wednesday, December 9

Wordless Wednesday (Almost)

picture taken with smartphone

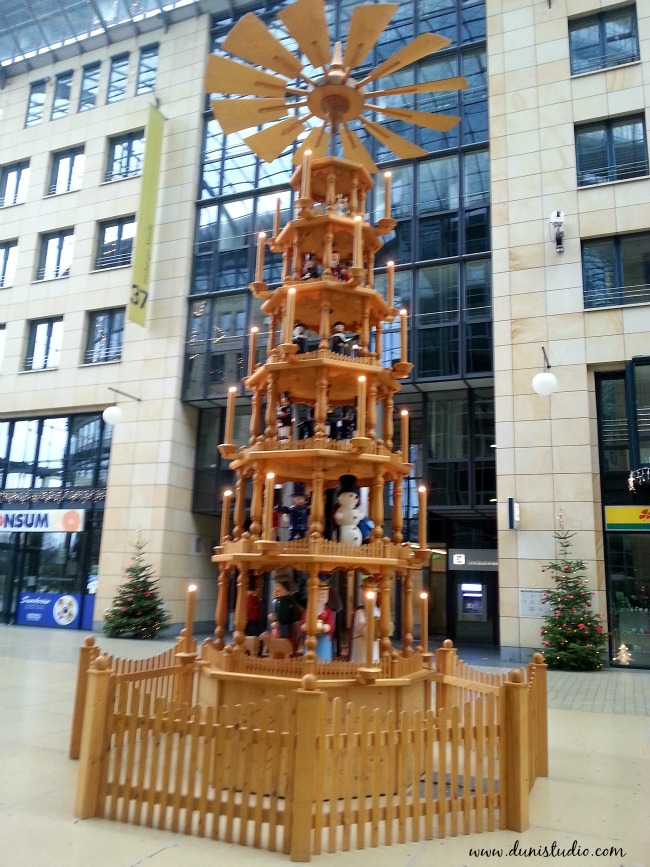
The Christmas Pyramids are one of the favourite products of the German Erz Mountains. Pictured is the giant version. (The figurines are revolving, therefore the image is a bit wobbly.) Typically people have a table top version that comes in various sizes from one to six tiers. When the candles are lit it creates a unique festive atmosphere and spreads warm light all over your living room.
*
Weihnachtspyramiden aus dem Erzgebirge sorgen für eine besonders festliche und gemütliche Stimmung in der Advents- und Weihnachtszeit. Oben seht Ihr ein gigantisches Exemplar. (Da sich die Pyramide dreht ist das Bild etwas verwackelt.) Für den Tisch zuhause gibt es sie von eins bis sechs stöckig. Die ruhige Drehbewegung sowie die detailreichen Figuren schaffen eine ganz besondere Atmosphäre.

linking up with my friend Verena today!

Monday, December 7

Monday Moodboard

1 -- 2 -- 3 -- 4


 ***

Awful doesn't even begin to describe the past 10 days. I am still processing all that's happened. I'm not sure I'll ever feel ready to blog about a dying parent. Besides, I've been publishing on the internet long enough to know that most readers aren't interested in another blogger's sob story... Too much sadness going around in the world these days anyway. It's difficult to get back to my usual blogging routine after an extended absence. I have zilch for you guys, nothing, nada, but since it's Monday, I might as well jump right in with a moodboard. Hope you like it!
*
Schrecklich ist noch zu mild ein Wort um die letzten 10 Tage zu beschreiben. Ehrlich gesagt, muss ich die Dinge die passiert sind noch verarbeiten. Ich bin also noch nicht wirklich präsent. Wie jede/r die/der bloggt weiß, ist es teilweise schwierig nach einer längeren Abwesenheit die übliche Schreib-Routine wieder aufzugreifen. Ganz abgesehen davon, dass ich absolut gar nichts für Euch vorbereitet habe, nix, nüscht. Aber heute ist ja Montag, der Tag an dem ich bekanntlich meine Moodboards (Collagen) zeige. Also mache ich das einfach mal!